K3d
介绍
K3d 是_使用_docker 容器在本地运行k3s 集群,用于方便学习和测试kubernetes 集群,切不可_用于生产环境。
k3s 包括以下一些组件:
- Containerd:一个类似 Docker 的运行时容器,但是它不支持构建镜像
- Flannel:基于 CNI 实现的网络模型,默认使用的是 Flannel,也可以使用 Calico 等其他实现替换
- CoreDNS:集群内部 DNS 组件
- SQLite3:默认使用 SQLite3 进行存储,同样也支持 etcd3, MySQL, Postgres
- Traefik:默认安装 Ingress controller 是 traefik 1.x 的版本
- Embedded service loadbalancer:内嵌的一个服务负载均衡组件
开发常用组件: 服务注册和发现:直接调用 service name 网关:Ingress 链路跟踪:skywalking 监控:prometheus 日志:elk
集群
命令创建
创建一个 1主2从 的集群:
k3d cluster create first-cluster --port 8080:80@loadbalancer --port 8443:443@loadbalancer --api-port 6443 --servers 1 --agents 2
其中,server 是主节点,agent 是工作节点,K3s的结构如下:
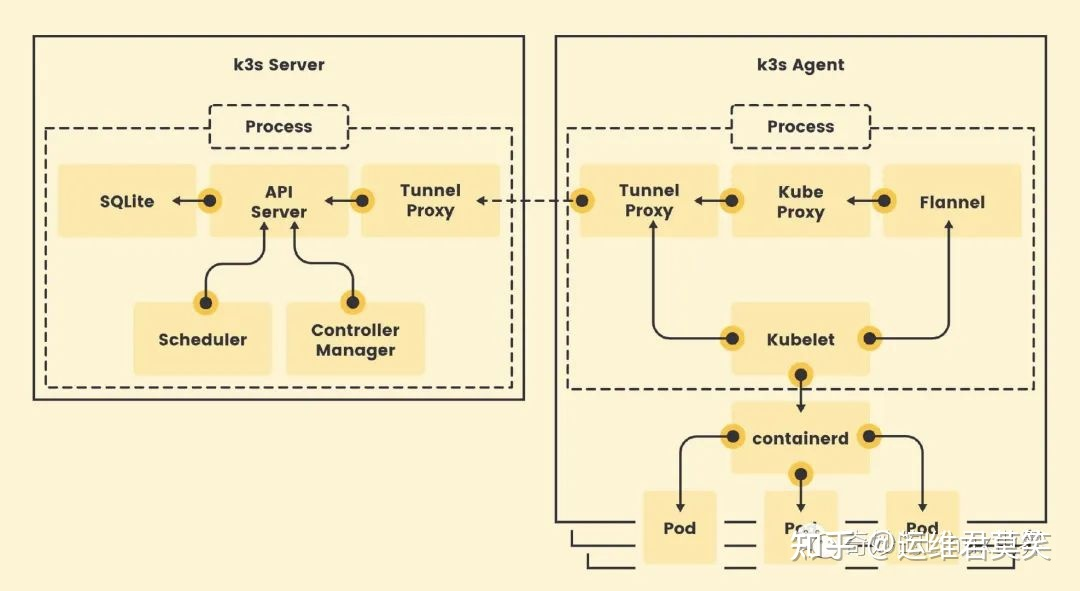
输出
akari@akari-pc:~$ k3d cluster create first-cluster --port 8080:80@loadbalancer --port 8443:443@loadbalancer --api-port 6443 --servers 1 --agents 2
INFO[0000] portmapping '8443:443' targets the loadbalancer: defaulting to [servers:*:proxy agents:*:proxy]
INFO[0000] portmapping '8080:80' targets the loadbalancer: defaulting to [servers:*:proxy agents:*:proxy]
INFO[0000] Prep: Network
INFO[0000] Created network 'k3d-first-cluster'
INFO[0000] Created image volume k3d-first-cluster-images
INFO[0000] Starting new tools node...
INFO[0001] Creating node 'k3d-first-cluster-server-0'
INFO[0001] Creating node 'k3d-first-cluster-agent-0'
INFO[0001] Creating node 'k3d-first-cluster-agent-1'
INFO[0002] Creating LoadBalancer 'k3d-first-cluster-serverlb'
INFO[0002] Using the k3d-tools node to gather environment information
ERRO[0007] Failed to run tools container for cluster 'first-cluster'
INFO[0007] Starting new tools node...
INFO[0015] Pulling image 'ghcr.io/k3d-io/k3d-tools:5.4.6'
INFO[0033] Starting Node 'k3d-first-cluster-tools'
INFO[0033] HostIP: using network gateway 172.20.0.1 address
INFO[0033] Starting cluster 'first-cluster'
INFO[0033] Starting servers...
INFO[0033] Starting Node 'k3d-first-cluster-server-0'
INFO[0038] Starting agents...
INFO[0038] Starting Node 'k3d-first-cluster-agent-0'
INFO[0038] Starting Node 'k3d-first-cluster-agent-1'
INFO[0045] Starting helpers...
INFO[0045] Starting Node 'k3d-first-cluster-serverlb'
INFO[0052] Injecting records for hostAliases (incl. host.k3d.internal) and for 4 network members into CoreDNS configmap...
INFO[0054] Cluster 'first-cluster' created successfully!
INFO[0054] You can now use it like this:
kubectl cluster-info
kubectl cluster-info 输出
akari@akari-pc:~$ kubectl cluster-info
Kubernetes control plane is running at https://0.0.0.0:6443
CoreDNS is running at https://0.0.0.0:6443/api/v1/namespaces/kube-system/services/kube-dns:dns/proxy
Metrics-server is running at https://0.0.0.0:6443/api/v1/namespaces/kube-system/services/https:metrics-server:https/proxy

To further debug and diagnose cluster problems, use 'kubectl cluster-info dump'.
k3d.io/v1alpha2 版本 yaml 文件创建
还可以用配置文件创建集群,新建一个 yml 文件 lincluster.yml
apiVersion: k3d.io/v1alpha2
kind: Simple
name: lincluster # 不能有下划线
servers: 1
agents: 2
kubeAPI:
  hostPort: "6443" # same as `--api-port '6443'`
ports:
  - port: 8080:80  # same as `--port '8080:80@loadbalancer'`
    nodeFilters:
      - loadbalancer
  - port: 8443:443 # same as `--port '8443:443@loadbalancer'`
    nodeFilters:
      - loadbalancer
指定配置文件创建
输出
# nathan @ nathan-tp in ~/app/k8s/lin [21:23:13] C:1
$ k3d cluster create --config lincluster.yaml
INFO[0000] Using config file lincluster.yaml (k3d.io/v1alpha2#simple)
WARN[0000] Default config apiVersion is 'k3d.io/v1alpha4', but you're using 'k3d.io/v1alpha2': consider migrating.
INFO[0000] portmapping '8080:80' targets the loadbalancer: defaulting to [servers:*:proxy agents:*:proxy]
INFO[0000] portmapping '8443:443' targets the loadbalancer: defaulting to [servers:*:proxy agents:*:proxy]
INFO[0000] Prep: Network
INFO[0000] Created network 'k3d-lincluster'
INFO[0000] Created image volume k3d-lincluster-images
INFO[0000] Starting new tools node...
INFO[0001] Creating node 'k3d-lincluster-server-0'
INFO[0004] Pulling image 'ghcr.io/k3d-io/k3d-tools:5.4.6'
INFO[0007] Pulling image 'docker.io/rancher/k3s:v1.24.4-k3s1'
INFO[0026] Starting Node 'k3d-lincluster-tools'
INFO[0125] Creating node 'k3d-lincluster-agent-0'
INFO[0125] Creating node 'k3d-lincluster-agent-1'
INFO[0125] Creating LoadBalancer 'k3d-lincluster-serverlb'
INFO[0132] Pulling image 'ghcr.io/k3d-io/k3d-proxy:5.4.6'
INFO[0170] Using the k3d-tools node to gather environment information
INFO[0170] HostIP: using network gateway 172.19.0.1 address
INFO[0170] Starting cluster 'lincluster'
INFO[0170] Starting servers...
INFO[0170] Starting Node 'k3d-lincluster-server-0'
INFO[0175] Starting agents...
INFO[0176] Starting Node 'k3d-lincluster-agent-1'
INFO[0176] Starting Node 'k3d-lincluster-agent-0'
INFO[0180] Starting helpers...
INFO[0180] Starting Node 'k3d-lincluster-serverlb'
INFO[0187] Injecting records for hostAliases (incl. host.k3d.internal) and for 4 network members into CoreDNS configmap...
INFO[0189] Cluster 'lincluster' created successfully!
INFO[0190] You can now use it like this:
kubectl cluster-info
k3d.io/v1alpha4 版本 yaml 文件创建
apiVersion: k3d.io/v1alpha4
kind: Simple
metadata:
  name: dev # 不能有下划线
servers: 1
agents: 2
kubeAPI:
  hostPort: "6443" # same as `--api-port '6443'`
ports:
  - port: 8080:80  # same as `--port '8080:80@loadbalancer'`
    nodeFilters:
      - loadbalancer
  - port: 8443:443 # same as `--port '8443:443@loadbalancer'`
    nodeFilters:
      - loadbalancer
启动
集群管理 kubecm
curl kubecm.tar.gz https://github.com/sunny0826/kubecm/releases/download/kubecm_v0.21.0_Linux_x86_64.tar.gz
tar -zxvf kubecm.tar.gz kubecm
查看切换
例子输出
# nathan @ nathan-tp in ~/app/k8s [10:45:39]
$ kubecm s
😸 Select:k3d-dev
「/home/nathan/.kube/config」 write successful!
+------------+------------+------------+------------------+-------------------------+--------------+
|   CURRENT  |    NAME    |   CLUSTER  |       USER       |          SERVER         |   Namespace  |
+============+============+============+==================+=========================+==============+
|      *     |   k3d-dev  |   k3d-dev  |   admin@k3d-dev  |   https://0.0.0.0:6443  |    default   |
+------------+------------+------------+------------------+-------------------------+--------------+

Switched to context 「k3d-dev」
Kubernetes 包管理器 Helm
安装 https://helm.sh/docs/intro/install/
安装 Traefik2 试试
# Add Traefik's chart repository to Helm
helm repo add traefik https://helm.traefik.io/traefik
helm repo update
helm install traefik traefik/traefik
看一下输出:
# nathan @ nathan-tp in ~ [11:12:39] C:1
$ helm repo add traefik https://helm.traefik.io/traefik
"traefik" has been added to your repositories

# nathan @ nathan-tp in ~ [11:13:16]
$ helm repo update
Hang tight while we grab the latest from your chart repositories...
...Successfully got an update from the "traefik" chart repository
Update Complete. ⎈Happy Helming!⎈

# nathan @ nathan-tp in ~/app/k8s [11:07:38]
$ helm install traefik traefik/traefik
NAME: traefik
LAST DEPLOYED: Fri Oct 28 11:15:18 2022
NAMESPACE: default
STATUS: deployed
REVISION: 1
TEST SUITE: None
NOTES:
Traefik Proxy 2.9.1 has been deployed successfully
on default namespace !
安装到指定命名空间:
# Install in a Dedicated Namespace
kubectl create ns traefik-v2
# Install in the namespace "traefik-v2"
helm install --namespace=traefik-v2 traefik traefik/traefik
看一下pod
# nathan @ nathan-tp in ~/app/k8s [11:21:39]
$ kubectl get pod
NAME                       READY   STATUS    RESTARTS   AGE
traefik-7b47dbff65-9dhbr   1/1     Running   0          6m28s
转发下端口再访问 http://0.0.0.0:9000/dashboard/#/ 仪表盘
# 以下两条命令都行
kubectl port-forward --address=0.0.0.0 $(kubectl get pods --selector "app.kubernetes.io/name=traefik" --output=name) 9000:9000
# namespaces traefik-v2
kubectl port-forward --address=0.0.0.0 -n traefik-v2 $(kubectl get pods -n traefik-v2 --selector "app.kubernetes.io/name=traefik" --output=name) 9000:9000
kubectl create secret docker-registry regcred \ --docker-server=<your-registry-server> \ --docker-username=<your-name> \ --docker-password=<your-pword>

kubectl describe pod   查看pod状态
参考
https://www.cnblogs.com/yinzhengjie/p/12231835.html 容器推送
https://www.cjavapy.com/article/2396/ kubertl 命令
https://github.com/bwcxyk/tools_file/blob/master/k8s/demo.yml